Wednesday, September 28, 2011

GRANDMA Tell Me About The Good Ole’ Days

“What children need most are the essentials that grandparents provide in abundance.  They give unconditional love, kindness, patience, humor, comfort, lessons in life.  And, most importantly, cookies - Rudolph Giuliani”

Well in my case my Grandma was a master of the most amazing recipes BUT my all time favorites were Grill Cheese Sandwiches and Sloppy Joes.  I remember when Grandpa was still here, it was a weekly thing for my Mom and I to go to Grandpa and Grandma’s for dinner and though she was a master of many foods, we always requested Sloppy Joes.  Now granted my Grandma made them just as most of us using ‘Manwhich’ but I tell you what, you would have thought we were eating at a 5 star Sloppy Joe Joint (Don’t know if those exist, but you get me).  The buns were always toasted just right (and ALWAYS just the right size), and the mix just melted in your mouth.  Maybe because it came out of (which my cousins and I thought was a magic stove FOREVER), or just because it was from Grandma – but it has always been one of my favs!

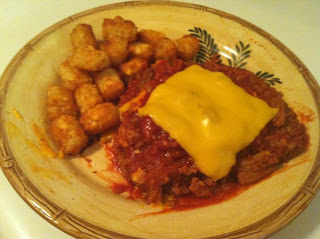
Now that I make them for my family, I for the longest time also used Manwhich, but because of the “wanna make it all from scratch” kick, I found an easy recipe (courtesy of Cooks.com) and made them tonight for us – MMM!  Now of course as always, I always end up missing one key ingredient and this tonight being buns…BUT I compromised and toasted some bread and slapped on top with some cheese and a side of tater tots – Voila!

Homemade Sloppy Joes

Ingredients:

1 ½ lbs ground beef (< --- I substituted Ground Turkey)
1 Small onion Chopped
1 ½ tsp. salt
¾ tsp pepper
1 tbsp Worcestershire sauce
1 tsp garlic powder
1 small can tomato sauce
1 small bell pepper

Directions:

1)       Brown ground beef and drain.
2)       Add onions, bell pepper then add all seasonings
3)       Add tomato sauce (rinse can and add a little water)
4)       Bring to boil, cut down heat then simmer for about 30 minutes

Hot Dog this was tasty!!!

Enjoy!

XO Lyndie

Wacko for Chicken Wednesday

I believe Mexican food is something if needed I could eat VERY day! I actually did this past Summer when Mike went to Florida. We have a little taqueria by the house we frequent often, and I love their homemade AUTHENTIC white cheese queso – haah! Well let’s just say, without having to plan meals for the both of us, I cheated and literally ate there EVERY night while he was gone. Sure, I am certain it wasn’t the BEST or healthiest for me, but oh well – some women love chocolate, I love Mexican food!

I had a recipe that I Have used for the past few years and it is quite yummy, but recently a girlfriend of mine made some homemade Sour Cream enchiladas her way, and though it was similar there was an extra step and less ingredients and it was DELICIOUS!!!! It was juicy, cheesy and just all around YUMMO!! I made this last night for hubby and I and wanted to share!!

Sour Cream Enchiladas:

Boneless chicken < --- (I Used about 6 Boneless Chicken Breast)


Block of Monterrey Jack cheese

Large Sour Cream

2 small cans of diced green chilies

Flour Tortillas Flour

Directions:

1) Cook the chicken in water and when done remove chicken and leave enough water for mixture and topping

2) Pour 3 quarters of the sour cream into the water along with one can of green chilies. Cook until sour cream is blended.

3) Shred chicken with fork or fingers and add 3 quarters of the sauce to the chicken and mix (it will be runny – great!!)

4) Pour a little flour into the rest of the sauce just to thicken a little. (high heat for a minute then low heat – stir constantly) turn off.

5) Heat a few tortillas in microwave at a time – roll up chicken mixture into tortillas with some shredded Monterrey jack cheese and place in pan

6) After all your enchiladas are placed in the pan you can top with any remaining chicken mixture – top that off with the thick sauce and top that off with other can of chilies and more cheeeese.

7) Bake in oven until all cheese melts (usually 350 for 20-30 mins)

**** For the sides, I just made canned black beans and Mexican yellow rice – yummy!!!

I have to say, I would not expect anything less to come from my friends kitchen, but this is definitely one of my favorites now!!!

Enjoy and remember one EASY ingredient you can ADD to any meal is a ‘Splash of Love’!

XO Lyndie

Monday, September 26, 2011

MMM! Meat!

With this weekend being such one that was full of memories, I thought of one of my favorite memories of growing up and that was my Mom’s Pot Roast. I remember (though when I was younger I Hated Left overs. I hated how all food looked, especially when it had any grease or gravy and it floated to the top and turned white. It especially happened with the gravy for the pot roast, and I refused to eat it the next day. Ugh! Yes, maybe a little spoiled – but just after seeing that “white stuff” on top, no matter that it would turn back to gravy once heated, I just couldn’t eat it.

My poor mom, she didn’t cook it in the crock pot as I do now a days, she actually browned it, made the gravy and cooked it in the conventional over checking on it every so often. She always whipped up delicious homemade potatoes as well – she was so good to me! And because I was a picky eater and up until almost junior high I ONLY craved beanie weenies, when my mom made a pot roast, it was something special. I remembered how the kitchen would smell, and I thought after such a great weekend of memories, I wanted to fill the house with the same smells from my home growing up.

I also made homemade mash potatoes (as I have said, I am usually an instant kinda gal) and Green Bean Casserole. For the casserole, I did not have any of the canned onions to mix and crush on top, so I got creative and made my own – I added recipe to that as well below 

Crock Pot Roast – Crock Pot Website:

Ingredients:

3 1/2 to 4 pounds boneless pot roast
1/4 cup flour
2 teaspoons salt
1/8 teaspoon pepper
3 carrots, chopped
3 potatoes, peeled and quartered
2 small onions, sliced
1 stalk celery, chopped
10 button mushrooms, sliced

Directions:

1) Trim all excess fat from the roast, brown and drain.
2) Combine 1/4 cup flour, salt and pepper and coat meat with the flour mixture.
3) Place all vegetables except mushrooms in the Crock-Pot® Slow Cooker and top with the roast.
4) Spread mushrooms evenly over the top of the roast.
5) Cover and cook on Low for 10-12 hours or on High for 4-6 hours.
*** For me, I did not add mushrooms, but added ½ can of French Onion Soup & a Bag of Lipton French Onion Soup Mix ( GREAT Flavor)

Green Bean Casserole

Ingrediants:

1 can (10 3/4 ounces) Campbell's® Condensed Cream of Mushroom Soup (Regular, 98% Fat Free or Healthy Request®)
1/2 cup milk
1 teaspoon soy sauce
Dash ground black pepper
4 cups cooked cut green beans
1 1/3 cups French's® French Fried Onions

Directions:

1) Stir the soup, milk, soy sauce, black pepper, beans and 2/3 cup onions in a 1 1/2-quart casserole.
2) Bake at 350°F. for 25 minutes or until the bean mixture is hot and bubbling. Stir the bean mixture. Sprinkle with the remaining onions.
3) Bake for 5 minutes or until the onions are golden brown.

**** For the Homemade Fried onions -- Food Website


Ingrediants:

3 large onions, sliced thin
2 cups milk
2 cups all-purpose flour
oil (for frying)
salt


Directions:


1) Soak the onions in the milk for 5 minutes.
2) Heat the oil in a large skillet or deep fryer.
3) Take a handful of onions and run them through the flour with a fork to coat.
4) Fry in batches in the oil, stirring as needed to brown evenly.
5) Drain on paper towels and season to taste.


As always, I hope you enjoy and thank you JESUS above for allowing me to share one of my most ultimate comfort foods with others!

XO Lyndie


Thursday, September 22, 2011

Bringing The Krabby Patties Above The Sea!

“There it is. The finest eating establishment ever established for eating. The Krusty Krab, home of the Krabby Patty – Sponge Bob”

Ok, So not exactly the “original” Krabby patty, but my own version --- YES, using crab! I found a recipe a while ago but you could substitute Canned Tuna, and for the past 3 years, that is what I have used. Hey Hubby loved it, I did too, so it worked. Well since I am striving to do this new venture and find new ways of cooking our favs, I came across this recipe (w/REAL Crab meat) and it was my goal to make my first “Krabby” Patties w/Real Crab Meat!

This had a few different ingredients that I gave a double look, but mmm! It turned out great!!!! Recipe courtesy of Shine! From Yahoo!


Ingredients:

2 Tbsp. sour cream
1 large egg, lightly beaten
1 cup soft, fresh breadcrumbs
2 Tbsp. fresh lemon juice
1 1/4 tsp. seafood seasoning
1 Tbsp. prepared horseradish
1/4 tsp. freshly ground black pepper
1 lb. fresh lump crabmeat, drained
1 Tbsp. butter
2 Tbsp. olive or vegetable oil
2 English muffins
4 thick slices Canadian bacon
4 large eggs
Simple Hollandaise

Directions:

Simple Hollandaise
Place 2 pasteurized egg yolks, 2 Tbsp. water, and 1/8 tsp. cayenne pepper in a blender. With motor running, add 10 Tbsp. melted butter in a slow, steady stream. Stir in 1 to 2 Tbsp. fresh lemon juice and 1/8 tsp. salt.

Preparation
Combine first 7 ingredients in a medium bowl. Fold in crabmeat. Shape crab mixture into 4 (3-inch) patties; chill 1 hour.

Melt butter with oil in a large skillet over medium-high heat; add crab cakes, and cook 4 to 6 minutes on each side or until golden. Cover and keep warm.

Split and toast English muffin halves among 4 serving plates; top each with 1 Canadian bacon slice, 1 crab cake, and 1 egg. Drizzle with Simple Hollandaise; serve immediately.


I hope you enjoy this simple dish as much as we do!

XOOX Lyndie


Wednesday, September 21, 2011

Who You Calling Cabbage Head?

“Cabbage: A vegetable about as large and wise as a man's head-Ambrose Bierce”


Now that Summer time is coming to a close, and we enter Fall, one of my favorite times of Summer are the picnics. Younger when at a picnic, I was all hotdogs and chips – you could not even get me to eat coleslaw…and in all honesty I did not realize till I was older that it consisted of Cabbage, which what little tike likes cabbage?

But as I am older now, my taste buds continue to grow and one of my most favorite staples at a picnic and now from my favorite little café in my building, American Essence, I have grown to love love love me some coleslaw.

I asked today the chef at our little café if the coleslaw he makes is a “secret” recipe or if it was something he was willing to share, and he shared…it was so easy, so of course I had to share!!!


Ingredients:

1 Small head cabbage, shredded
3 medium carrots, shredded
1 cup mayonnaise
1/3 cup sugar
1/4 cup cider vinegar
A scoop of raisins

Directions:

In a large bowl, combine cabbage and carrots. In a small bowl, combine the mayonnaise, sugar and vinegar. Pour over cabbage mixture and toss to coat. Serve with a slotted spoon.


As always enjoy!

XO Lyndie

PS – Thank You JESUS for our recent rains!


Tuesday, September 20, 2011

A Few Good Eggs

“A true friend is someone who thinks that you are a good egg even though he knows that you are slightly cracked – Bernard Meltzer”


Love this quote :) which brings me to today’s recipe, the incredible, edible egg – egg salad that is.

I love love love all sorts of sandwiches and recently fell for a deli near the office that Hubby and I found and they make the best egg salad sandwiches. I was recently craving one and because of my whole experiencing new recipes and such, I can across a real easy one, and I must say it turned out really good!

I think the deli has a few more ingredients, but for just a simple copy-cat version, this is perfect!! Courtesy of ALL Recipes, I came across this one:

Ingredients:

6 large eggs
1/4 cup mayonnaise (for my mayonnaise, I have used the one with olive oil in it – mmm good)
1 tablespoon mustard
Salt and pepper

Directions:

1) Place eggs in a pot and add enough water to cover eggs by at least one inch.

2) Quickly bring the water to a boil, then remove from heat and let the eggs sit in the hot water for 15 minutes.

3) Remove eggs from hot water and immediately place them in a bowl filled with ice until they're cooled completely.

4) Peel the cooled eggs and dice or mash them.

5) Mix together mayonnaise and mustard; combine with the eggs.

6) Add salt and pepper to taste.

7) Refrigerate for at least an hour to allow the flavors to combine.


I added a little lettuce to mine and a little extra mayo on the bread, just because I love so much!!

Enjoy!!!

XO Lyndie

Sunday, September 18, 2011

Mac – N – Cheese – No Spoon Needed

“For our first date, I made Ryan Hamburger Helper, which is basically what I grew up on. I make my own version of it now, with macaroni and cheese and hamburger meat. And the kids - it's their favorite dinner - Reese Witherspoon”

Mac and Cheese along in my opinion is about as American as Baseball to our country! It is just a staple I feel everyone has in their cupboard next to the maple syrup for Pancakes.

A while ago, Jack-n-Box had on the menu deep-fried Mac-N-Cheese. DELICIOUS!!! They went away and now, James Coney Island has them, but had pondered on making them myself and thanks to All Recipes I found an easy recipe and I had to try it!

I am glad I did --- they are AWESOME, Cheesy & Oh So Easy!!!


Ingredients:

2 cups uncooked elbow macaroni
1 tablespoon butter
1 egg, beaten
1 cup milk
1 1/2 cups shredded sharp Cheddar cheese
1 1/2 cups shredded mozzarella cheese
1/2 cup seasoned dry bread crumbs
2 teaspoons olive oil
1/2 teaspoon salt

Directions:

1) Preheat the oven to 350 degrees F (175 degrees C). Grease a muffin tin with nonstick cooking spray. In a small bowl, stir together the bread crumbs, olive oil and salt; set aside.

2) Bring a large pot of lightly salted water to a boil. Add the macaroni and cook for about 8 minutes, it should still be a little bit firm. Remove from the heat, drain and return to the pan; stir in the butter and egg until pasta is evenly coated. Reserve 1/2 cup of sharp Cheddar cheese and stir the remaining Cheddar cheese, milk and mozzarella cheese into the pasta. Spoon into the prepared muffin tin. Sprinkle the reserved cheese and the bread crumb mixture over the tops.

3) Bake for 30 minutes in the preheated oven, or until the topping is nicely browned.

4) Allow the muffins to cool for a few minutes before removing from the pan. This will allow the cheese to set and they will hold their muffin shape.


Enjoy --- We Did!!

XO Lyndie

Thursday, September 15, 2011

Under The Sea

“Down Here All The Fish Is Happy As Off Through The Waves, They Roll The Fish On The Land Ain't Happy, They Sad 'Cause They In Their Bowl But Fish In The Bowl Is Lucky – Little Mermaid”

I know we are heading into “Fall” hear in Texas, but I believe here in Texas (Houston) Summer Salads are in style all year round! I was given this recipe a while ago from a friend who snagged it from Betty Crocker website and I fell in love!!

It incorporates the ultimate American Classic BLT, with a seafood splash – very easy and great for dinner or a get together!

Seafood BLT Salad:

1 box Betty Crocker® Suddenly Salad® ranch & bacon pasta salad mix
¾ cup mayonnaise
2 tablespoons milk
2 tablespoons lemon juice
3 cans (6 oz each) lump crab meat, rinsed and drained
1/4 cup thinly sliced green onions
4 slices bacon, crisply cooked and crumbled (1/4 cup)
2 cups thinly sliced iceberg lettuce
2 medium tomatoes, chopped and drained

Directions:

1) Empty Pasta mix into 3-quart saucepan 2/3 full of boiling water. Gently boil uncovered 12 minutes, stirring occasionally.
2) Meanwhile, in large bowl, stir together Seasoning mix, mayonnaise, milk and lemon juice. Stir crab meat, green onions and bacon.
3) Drain pasta; rinse with cold water. Shake to drain well. Stir pasta into salad mixture. Cover and refrigerate 1 hour to chill. Just before serving, gently toss with lettuce and tomatoes to coat.


This is a delicious take on the original BLT (because other than my instant mash potatos – I LOVE me some bacon!)

Enjoy! And always, LORD Thank you for my continued energy to do this ALL!

OXOX

Lyndie


Wednesday, September 14, 2011

Lasagna With A Twist!

“You can tell how long a couple has been married by whether they are on their first, second or third bottle of Tobasco - Bruce Bye”


Ha! I had to laugh at this because Mike and I love Ketchup and Hot Sauce on just about anything! It doesn’t always mean it needs it, just something we feel we have to have!

One of my favorite meals to make is lasagna. Over the years I have tried to make it several different ways; with sausage, hamburger, turkey meat. I have tried to incorporate different cheeses, different sauces and anything to change up the “same ole” recipe. Well it NEVER fails, I always go back to our comfort and make the same ole way I have for years, which in fact in our very favorite. I had a friend email me a while ago, and she said she had made lasagna and used all the same ingredients but traded the ricotta for cream cheese. Well I must say…It was absolutely fabulous!! It added a little tang that was just enough to make a difference, but yet you still felt you were eating your favorite homemade lasagna!

Ingredients:

*** 1 pound lean ground beef
1 (32 ounce) jar spaghetti sauce
*** 32 ounces Ricotta cheese
3 cups shredded mozzarella cheese
2 eggs
1/2 cup grated Parmesan cheese
2 teaspoons dried parsley
Salt to taste
Ground black pepper to taste
*** 9 lasagna noodles
*** I replaced the ricotta with cream cheese and for the noodles; I use the oven-ready.

Directions:

1) In a large skillet over medium heat brown the ground beef. Drain the grease. Add spaghetti sauce and simmer for 5 minutes.
2) In a large bowl, mix together the cream cheese, 2 cups of the mozzarella cheese, eggs, half of the grated Parmesan cheese, dried parsley, salt and ground black pepper.
3) To assemble, in the bottom of a 9x13 inch baking dish evenly spread 3/4 cup of the sauce mixture. Cover with 3 uncooked lasagna noodles, 1 3/4 cup of the cheese mixture, and 1/4 cup sauce. Repeat layers twice. Top with 3 noodles, remaining sauce, remaining mozzarella and Parmesan cheese. Add 1/2 cup water to the edges of the pan. Cover with aluminum foil.
4) Bake in a preheated 350 degree F (175 degrees C) oven for 45 minutes. Uncover and bake an additional 10 minutes. Let stand 10 minutes before serving.


I have to admit it was really good and as I said, it added just enough difference to notice, but it was a good change!

Hope you enjoy – and if you have any twists on an old-fashioned meal, please do share!!!

XO Lyndie


Sunday, September 11, 2011

Nothing Close to ‘Schweddy’ Balls

Sorry – I just love that skit from Saturday Night Live and now that Ben and Jerry’s is coming out with an ice cream – I just had to chuckle when posting this recipe --- because they are surely far from those kind of balls.

One of Hubby and I’s favorite meals is Swedish Meatballs. I sometimes stock up on the 98 cents microwave meals just to have on hand when the craving arises. Since I am on the track of wanting to really start getting more in the kitchen on a regular basis, I came across a recipe in The Food Network Magazine (Thank you Melinda – still one of my FAVORITE Mag Subscriptions ;), I also found the recipe on the Food Network Website – one of the best cooking sites!!

I hate to seem like I am boasting, but I AM! These balls turned out REALLY good! I made a little side of noodles, and some mash potatoes (< --- Instant tonight) --- Do you see a pattern with the taters? I LOVE THEM! Almost Famous Swedish Meatballs -- > It is supposed to be the knockoff of the ones they serve at IKEA!

Ingredients:

For the Meatballs:

1 cup breadcrumbs
2 tablespoons unsalted butter
1/3 cup minced white onion
2 cloves garlic, minced
1/4 teaspoon ground allspice
( a pinch) Kosher salt and freshly ground white pepper
1/2 cup milk
1 teaspoon Worcestershire sauce
3/4 pound lean ground beef
1/2 pound lean ground pork
1 large egg plus 1 egg white, beaten
Vegetable oil, for brushing

For the Gravy:

2 tablespoons unsalted butter
2 tablespoons all-purpose flour
1 1/2 cups low-sodium beef broth
1 teaspoon Worcestershire sauce
1/4 cup heavy cream
Kosher salt and freshly ground black pepper
2 tablespoons chopped fresh parsley (optional)
Lingonberry jam, for serving (optional)

Directions:

Make the Meatballs:

1) Put the breadcrumbs in a large bowl.
2) Heat the butter in a skillet over medium heat.
3) Add the onion, garlic, allspice, 2 teaspoons salt and 1/4 teaspoon white pepper and cook, stirring, until soft, about 5 minutes.
4) Add the milk and Worcestershire sauce and bring to a simmer.
5) Pour the milk mixture over the breadcrumbs and stir to make a thick paste; let cool.
6) Add the beef, pork, egg and egg white to the bowl and mix until combined.
7) Brush a baking sheet with vegetable oil.
8) Roll the meat into 1-inch balls and arrange on the prepared baking sheet.
9) Cover with plastic wrap and refrigerate at least 1 hour.
10) Preheat the oven to 400 degrees F.
11) Bake the meatballs until cooked through, about 20 minutes.

Make the Gravy:

1) Melt the butter in a large skillet over medium heat.
2) Add the flour and cook, whisking, until smooth.
3) Whisk in the beef broth and Worcestershire sauce and bring to a simmer.
4) Add the cream and meatballs.
5) Reduce the heat to medium low and simmer until the gravy thickens, about 10 minutes.
6) season with salt and black pepper.
7) Transfer to a serving dish;
8) sprinkle with the parsley and serve with lingonberry jam, if desired.


As for the mash potatoes I just used instant. For the noodles, I just used regular (Kroger Brand) egg noodles.

This turned out really good and was not at all hard to make and did not take a lot of time, so it would be perfect even after a day at work.

Enjoy!

XO Lyndie


Thursday, September 8, 2011

An Apple a Day Keeps The Doctor Away?

Well this old saying didn’t stand too true for me. I came down with Bronchitis and did not have much of an appetite, and in the normal tradition I was not craving Chicken Noodle Soup, but yet French Onion soup. Well since I am on the kick of wanting to keep things creative, rather than Hubby run to the store to get us a can, he made us some homemade French Onion Soup, and MMM! It was good!

I found the recipe courtesy of Cook.com. It is super simple and really inexpensive. Of course as any recipe you can always mash it up the way you want to add or remove, and for us, we just made some grill cheese sandwiches rather than the French Begets.

Ingredients:

3 tbsp. butter
1 tbsp. oil
4 c. finely sliced onions
2 (10 1/2 oz.) cans beef broth
2 cans water
1 tsp. salt
Freshly ground pepper to taste
3 tbsp. brandy (optional)
4 slices French bread (toasted)
4 tbsp. grated Swiss cheese
4 tbsp. grated Parmesan cheese

Directions:

1) Melt butter in heavy pot.
2) Add oil and heat.
3) Add onions and sauté for about 15 minutes, stirring often.
4) Add broth, water, salt and pepper.
5) Bring to a boil; reduce heat and simmer for 45 minutes.
6) Add brandy and simmer for 10 more minutes.
7) Transfer soup to 4 individual oven proof bowls.
8) Top each with a slice of French bread, 1 tablespoon of Swiss cheese and 1 tablespoon grated Parmesan cheese.
9) Place under broiler until cheese is golden. .
10) Serve immediately.


I got a request for it today, so I thought I would post for anyone else out there hankering for some homemade soup 

XO Lyndie


Wednesday, September 7, 2011

Browsing For Breakfast & Found Dinner

Geesh! I am having fun with this new blog :) it really is motivating me to seek out new recipes to try! Today I browsed a new website (actually another recipe blog) that was sent to me --- http://joyinmykitchen.blogspot.com/ and in search of a fun and spicy breakfast skillet type casserole concoction I found this goodie which takes the eggs out of the equation and adds chicken!

Check it Out:

Cheddar Chicken and Potatoes - Adapted from Kraft Foods

4 slices bacon
4 chicken breasts (or 6-8 chicken tenders)
2 C diced potatoes
2 C diced bell peppers (green, red)
1/2 medium onion, diced
salt and pepper, to taste
4 oz. extra sharp cheddar (or Colby Jack) cheese, shredded

Preparation:

1) Cook bacon in the skillet over medium heat until bacon is crunchy.
2) Remove bacon from skillet and place on a paper towel to de-grease. Then, remove almost all of the grease from the pan (less about 1 tsp.).
3) Chop and prepare the potatoes, onion and peppers.
4) Sauté the peppers, potatoes and onions in the 1 tsp. bacon grease for about 7 minutes. Season with salt and pepper, to taste.
5) Remove veggies from skillet and set aside.
6) If the skillet still contains grease, then just add the chicken. If not, add a few dribbles of bacon grease to aid in cooking the chicken.
7) Cook chicken over medium heat until juices run clear.
8) When chicken is cooked, return potatoes to the pan, and continue cooking potatoes/onions/peppers until crisp/tender. Then, crumple cooked bacon and add to the skillet. Stir to combine.
9) Sprinkle with cheese, and cover until cheese is melted.
10) Remove from heat and serve warm.


And as my Hubby has come to know, I don’t play by the rules in the kitchen. I know there are the starch rules and what goes with what, etc…but I just like to eat and mix it up what we are craving! Now with that being said, I probably would not host a dinner party with lasagna and mash potatoes and corn (No Matter How Much I Love ALL those 3 foods – not necessarily together, but just love them and sometimes crave at the same time ;)

Anyhow, we have been craving some sweet potatoes, so I found an easy Sweet Tato Mash (courtesy of www.Allrecipes.com):

Ingredients:

6 sweet potatoes, peeled and cubed
3/4 cup milk
1/2 cup butter
***3/4 cup maple syrup

Preparation:

1) Bring a large pot of salted water to a boil. Add potatoes and cook until tender, 20 to 30 minutes.
2) ***With an electric mixer on low, blend potatoes, slowly adding milk, about 1/2 a cup at a time. Use more or less to achieve desired texture. Add butter and maple syrup, to taste. Blend until smooth. Serve warm.


***(The Maple Syrup adds such a Thanksgiving type Sweet Potato Casserole taste to it!)

Ending with a side of Kroger’s French Bread (adding a little cheese on the top) and again – another (semi-healthy meal?)

Either way, it was delicious and a new treat for the recipe books!! Remember, as the original website stated, this would make a PERFECT breakfast just taking away the chicken and adding eggs!

As always, Thank you LORD for the energy to work all day and have the energy to cook fun new meals for my family!

XO Lyndie

Tuesday, September 6, 2011

A Little Bit of Chicken Fried?

Hi ALL!

Going through the pantry, I always like to find ingredients to make our meals complete. Not HUGE on cereal, I came across a box of Chex that I bought on a whim while I had the craving...needless to say, I still had a whole box!

Browsed through some recipes and came across this one for Corn Chex Chicken Breasts, courtesy of this Fab New Website I found. I had made something similar to this a little while ago using corn flakes, so thought this would work just as good.

Ingredients:

* 2 cups buttermilk
* 3 cloves garlic, peeled and crushed
* 3 tablespoons hot sauce (Tabasco or similar)
* 1 tablespoon salt
* 2 teaspoons ground black pepper
* 1/2 teaspoon paprika
* 1/2 teaspoon cayenne pepper
* 1 1/4 cups corn chex cereal, crushed into crumbs
* 4 tablespoons butter
* 4 boneless skinless chicken breast halves, cut 1/2 breasts in half again, so chicken will cook through.

Directions:

***1) Combine buttermilk, garlic, hot sauce, salt, pepper, paprika, and cayenne pepper in a large bowl and stir until combined.

2) Rinse chicken and pat dry. Place chicken in 13x9-inch baking dish. Pour buttermilk mixture over chicken, cover and refrigerate 30 minutes.

3) Heat the oven to 400 degrees F. Place corn flake crumbs in shallow dish and season stir in salt and ground black pepper. Remove chicken from buttermilk mixture and dredge in corn flake crumbs, coating completely.

4) Place coated chicken on foil (or parchment) lined baking sheet. Drizzle melted butter over chicken pieces. Bake until crispy and golden, approximately 35 minutes.

***Now for us, we did not have any milk, so I used fat-free mayo and added the hot sauce into the mix -- added a GREAT flavor!!!


Added a side of HOMEMADE Mash Potatoes (I Am usually an instant box kind of gal!) So this was a treat, a little corn and voila! Dinner for tonight and enough for lunch tomorrow!

MMM for the tummies and easy on the wallet!

XO Lyndie

PS - As always I thank you JESUS for the energy to come home and do all of this!!

I Say Tomato - You Say To-Ma-TOE!

Courtesy of my good friend Angelique, she donated this recipie which I put into gear a little while ago, and O-MA-Goodness! Growing up I HATED tomatos and various other veggies, but as you get "older" your taste buds "mature"?

I love love love tomatos and this has become a new favorite -- Baked Parmesan Tomatos:

Ingrediants:

4 tomatoes, halved horizontally
1/4 cup freshly grated Parmesan cheese
1 teaspoon chopped fresh oregano
1/4 teaspoon salt
Freshly ground pepper, to taste
4 teaspoons extra-virgin olive oil

Preparation:

1. Preheat oven to 450° F.

2. Place tomatoes cut-side up on a baking sheet. Top with Parmesan, oregano, salt and pepper. Drizzle with oil and bake until the tomatoes are tender, about 15 minutes.

Very EASY and Healthy!!!

XO Lyndie

Another New Venture


So ALL who know me, know I LOVE to cook (and eat!) In my early 20's I was no stranger to Mc Donald's or a quick run through What-A-Burger after a night of dancing with friends. Well as we get older, the foods that once were SO easy to work off on the dance floor become really good friends with all your body and latch on to those curves!

I strive daily to find new and healthy recipies for Hubby without depriving us of our passions -- and let's face it, eating "healthy" is not always the cheap route either! Granted, we love our taqueria's and our comfort foods, so needless to say we will not shed those anytime soon (but with the right exercises and learning to eat in moderation) food can once again become your friend -- NOT enemy ;)

As I am addicted to writing lengthy blog entries on my original (personal) blog -- My Therapy - I thought it would be fun to incoporate my love of writing into a blog that can offer fun, easy recipies donated by myself and all others!

Hubby and I have several family and friends with killer skills in the kitchen and I thought how fun to incorporate them all into a blog.

I hope you will enjoy reading and contributing as much as I will learning all sorts of new recipies from all over!

XO Lyndie